Address
12207 Chandler Blvd Valley Village CA 91607Outdoor security camera installation near Los Angeles is an essential part of any home or business surveillance system. Not only do they provide an extra layer of protection against intruders, they also allow you to monitor your property remotely and keep an eye on the activity around your home or business. When it comes to installing outdoor security cameras, there are a few things you need to consider before starting the project.
First, you need to determine what type of camera system you want (wired or wireless) and where it should be located. You’ll also need to consider the power source for the cameras and what type of mounting hardware is needed for installation. Finally, you should also consider whether or not you will need professional installation services. Once these basics are determined, then you can begin planning and installing your outdoor security camera system.
 Why outdoor security camera installation is important?
There are several reasons why outdoor security camera installation is important in Los Angeles:
1. Deterrent – Outdoor security cameras can deter potential intruders or criminals from targeting your property. The mere presence of a security camera can make would-be offenders think twice before committing any crime.
2. Surveillance – Outdoor cameras can provide surveillance of the surrounding area, which can help identify intruders or suspicious activity. This can help law enforcement apprehend offenders and prevent future incidents.
3. Remote monitoring – With remote monitoring, homeowners can monitor their property from anywhere through their mobile device or computer. This can provide peace of mind and allow homeowners to check in on their property when they are away.
4. Evidence – If a crime does occur, outdoor cameras can provide valuable evidence for law enforcement and insurance claims. The footage can be used to identify suspects and provide evidence in court. Overall, outdoor security camera installation near Los Angeles is an important step in safeguarding your property and ensuring the safety and protection of your family and assets.
Benefits of installing outdoor security cameras
1. Deter Criminal Activity: Outdoor security cameras can deter potential criminals from targeting your property. When they see cameras installed, they may think twice before breaking into your property or attempting any criminal activity.
2. Provides Evidence: In case of any criminal activity, the footage provided by outdoor security cameras can be useful evidence to identify the culprits and bring them to justice.
3. Monitoring: These cameras allow you to monitor activities around your property, even when you are away. They can be connected to your smartphone, so you can check on your property 24/7.
4. Peace of Mind: If you have a large property, outdoor security cameras can provide you with peace of mind knowing that you can monitor activity around your property from anywhere, anytime.
5. Insurance Benefits: Having outdoor security cameras installed can help you lower insurance premiums by reducing the risk of theft, burglary or vandalism.
6. Protects your Property: Outdoor security cameras are an effective way to protect your property from vandalism, theft, and other security threats.
7. Prevents False Claims: Outdoor security cameras can also prevent false claims made against you by providing accurate footage of activities around your property. Overall, installing outdoor security cameras offers several benefits that can help protect you, your property, and provide peace of mind.
Choosing the Right Location for Camera Installation
1. Survey the area: Before installation, it is crucial to survey the area and analyze the potential risks and threats. This includes the entry and exit points, blind spots, high-risk areas, and locations that require constant monitoring.
2. Observe lighting conditions: Lighting conditions can have a significant impact on the camera’s image quality. Ensure that the camera’s location is appropriately illuminated to capture clear footage.
3. Adequate power supply: Ensure that the location has an adequate power supply to power the camera.
4. Choose the right camera type: Choose the appropriate camera type for the location. For instance, indoor cameras have different features and specifications compared to outdoor cameras.
5. Consider weather conditions: If the camera is being installed in an outdoor location, consider weather conditions such as rain, snow, and extreme temperatures.
6. Install at a height: Install the camera at a height where it is not easily accessible but can still provide clear footage.
7. Conceal the cameras: Conceal the cameras as much as possible to avoid theft or damage. This can be done by installing the camera in a protective housing or covering it with objects such as foliage.
 Types of Outdoor Security Cameras
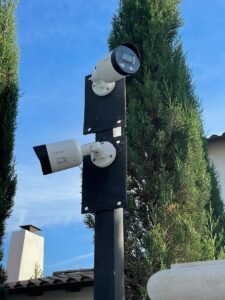
1. Bullet Cameras: Bullet cameras are long and cylindrical in shape. They are designed to be mounted on outdoor walls or ceilings and are usually weatherproof.
2. Dome Cameras: Dome cameras are round and can be mounted on ceilings or walls. They come in different sizes and can be tinted or clear.
3. PTZ Cameras: PTZ (Pan, Tilt, Zoom) cameras allow you to pan, tilt and zoom in on a particular area. They are usually mounted on outdoor walls or poles.
4. Thermal Cameras: Thermal cameras detect heat signatures and are ideal for detecting intruders at night or during low-light conditions. They can be mounted on walls or poles.
5. Wireless Cameras: Wireless outdoor cameras are easy to install and can be placed anywhere. They use Wi-Fi to connect to the internet and communicate with your device.
6. Box Cameras: Box cameras are usually enclosed in a protective metal casing and are designed for use in harsh weather conditions.
7. Floodlight Cameras: Floodlight cameras are outdoor security lights with a built-in camera. They turn on when motion is detected and can capture clear video footage.
8. Hidden Cameras: Hidden cameras are usually small and can be disguised as common objects such as birdhouses or rocks. They are ideal for covert surveillance.
DIY vs Professional installation
DIY (Do-It-Yourself) installation refers to the process of setting up or installing something yourself, without the help of a professional. On the other hand, professional installation involves hiring a skilled technician or installer to carry out the installation process for you.
There are pros and cons to both DIY and professional installation methods. Some benefits of DIY installations include cost savings, flexibility, and control over the process. However, some drawbacks include the potential for mistakes, lack of expertise, and limited warranties. Professional installation, on the other hand, can provide peace of mind, expert advice and guidance, and warranties to ensure the product or system functions properly.
However, it can be more expensive and less flexible in terms of scheduling and customization. Ultimately, the choice between DIY and professional installation will depend on your specific needs, skills, and budget. It’s important to weigh the pros and cons of each option and choose the method that will work best for you.
Step-by-step guide for outdoor security camera installation
Here are the steps for installation:
1. Choose the right location: Find an area on your property where you want to install the camera(s). Place them high enough to avoid vandalism but low enough to capture good footage. Ensure that it gets an unobstructed view of the area of interest.
2. Check power sources: Before buying a camera, consider the available power sources; whether the camera requires an outlet or battery, and ensure there is no obstruction to the source.
3. Weatherproofing: Since the cameras will be exposed to weather elements, verify that the camera is rated IP66 or IP67 to withstand weather changes.
4. Test camera angle: Test the camera angles to ensure they capture the activity of interest, such as people entering gates, main doors, or around the perimeter of your property.
5. Connect wires: Connect the camera wires through the wall or drill a hole and insert the wires (if required). Ensure that the wires are secured and hidden from view.
6. Attach the mounting bracket: Use the screws from the bracket to attach it securely to a stable surface, such as a wall or ceiling.
7. Screw on the camera: Once the mounting bracket is in place, fix the camera to it, ensuring that the camera is levelled.
8. Configure the settings: Configure the settings such as privacy masks; motion detection, and notification alerts according to your preference.
9. Test the camera: Verify that the camera is streaming live footage and test its motion detection to ensure it’s functioning as planned.
10. Maintain your camera: Keep your camera clean and free from obstruction from time to time. If the camera needs maintenance or replacement, ensure that you do so promptly. Note: These steps are not definitive, and you may need to follow a different set of instructions based on the manufacturer’s guidelines.
Common installation mistakes to avoid during outdoor security camera installation
1. Poor placement: Installing the camera in a location that is too high, too low or too close to the ground can compromise visibility and make it easier for intruders to tamper with the camera.
2. Poor wiring: Improper wiring can result in power or signal issues that can affect camera performance. Always use high-quality wiring that is designed for outdoor use and ensure it is installed properly to avoid exposure to weather elements.
3. Improper camera selection: Choosing a camera that is designed for indoor use can result in poor performance and can be easily damaged by moisture or extreme temperatures. Always choose a camera that is specifically designed for outdoor use, with waterproof and weather-resistant features.
4. Insufficient lighting: Inadequate lighting or placing the camera directly facing a light source can result in image distortion or poor quality images. Ensure that the camera is placed in a location that has sufficient light and is free from any obstruction.
5. Neglecting security: Leaving your security camera exposed or failing to password protect it can leave it vulnerable to hacking and other security risks. Always ensure that your camera is fully secured with strong passwords and other security measures.
6. Ignoring local regulations: Installing security cameras without proper permits or violating local privacy laws can lead to legal issues and penalties. Always make sure you understand the regulations in your area and obtain the necessary permits for installation.
Why Choose Onboard IT Tech For Outdoor Security Camera Installation Near Los Angeles?
1. Expertise: We have a team of experienced professionals with extensive knowledge and expertise in outdoor security camera installation near Los Angeles.
2. Quality Products: We use high-quality security cameras and equipment that are designed to withstand harsh outdoor environments.
3. Customized Solutions: We provide customized security solutions that are tailored to meet the unique needs of our clients.
4. Affordable Prices: Our prices are competitive and affordable, without compromising on the quality of our products and services.
5. Excellent Support: We offer excellent customer support before, during, and after installation to ensure that our clients are satisfied with our services.
6. Safety: We ensure that the installation process is done safely and securely with minimal disruption to our clients’ daily activities.
7. Warranty and Maintenance: We provide warranties and offer maintenance services to ensure that our clients’ security systems are always in top condition.
8. Advanced Technology: We use the latest technology and equipment to provide our clients with the most advanced security solutions.
Read More About-
- Outdoor Sound System In Los Angeles- Best Installation Service
- Smart Home Outdoor Lighting In Pacific Palisades- Affordable 1
- Smart Home Outdoor Lighting In Malibu- Amazing 1
- Protect Your Business with a Security Alarm System Los Angeles
- Security Camera With Installation Los Angeles- 7 Effective Tips
- Top Security Alarm Systems Homes Los Angeles
- Security Camera Installer Brentwood
